Deciding on a Tiny House trailer is one of the most important decisions you will make when building your tiny house. The trailer is the foundation of which everything else is built upon, so this is not a decision you should take lightly. To help educate you and answer many of your questions we’ve compiled this extensive guide based on our more than 11 years of experience manufacturing and selling tiny house trailers.
Parts and Dimensions of a Tiny House Trailer
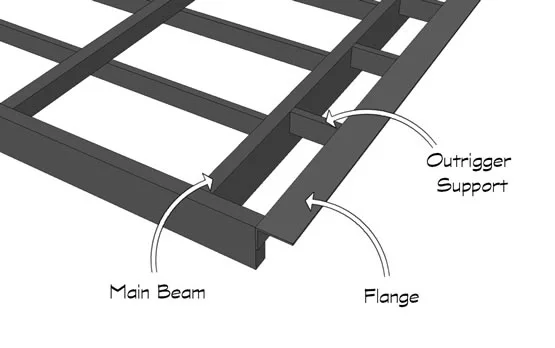
Before we get started with deciding on the type, size, and features that would best work for your tiny house trailer, lets first discuss the parts and learn the terminology associated with them. Before you know it, we’ll have you talking like a pro.
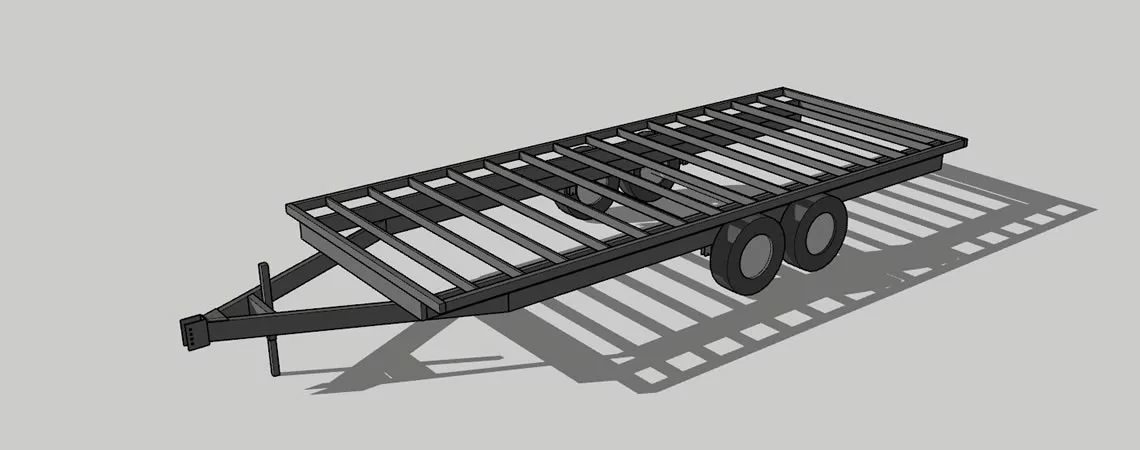
Parts of the Trailer
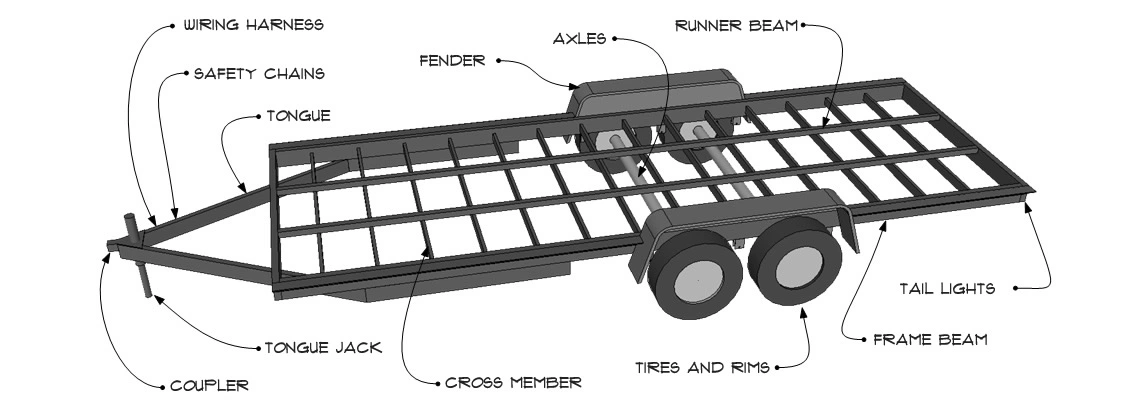
Wiring Harness
The wiring harness is a 7-pin plug that attaches to the tow vehicle. This powers the lights and brakes on the trailer. Some vehicles are only equipped with a 4-pin plug. A 4-pin to 7-pin adapter can be purchased, but this will only control the lights on the trailer and not the brakes.
Safety Chains
The safety chains act as a second line of defense against the trailer separating from the tow vehicle, in the event the coupler or hitch fails. There is also a break away kit that will automatically engage the trailer brakes if the chains fail (not shown).
Tongue
The tongue is a steal A-frame that connects the coupler to the main frame of the trailer.
Fenders
These are not structural, so you can’t use them to carry the load of your house (you will need to build a header over the fenders if your design extends over them).
Axles
The axles connect the wheels together and are rated for different capacities.
Runner Beams
The runner beams are 2x2 square tubing and replace the wood decking found on conventional trailers.
Tail Lights
The tail lights serve the same function as the tail lights on your vehicle. After your house is complete, your vehicles tail lights will not be visible.
Main Frame
The main frame of the trailer is constructed of 2x6 square tubing. The thickness varies based on the length of the trailer.
Tires and Rims
We use radial tires over bias ply for strength and durability.
Cross Members
The cross members provide extra support to the trailer.
Tongue Jack
The tongue jack is used to lift the trailer on and off of the tow vehicle when moving. It can also be really helpful when leveling the house.
Coupler
The coupler is a standard 2-5/16”.
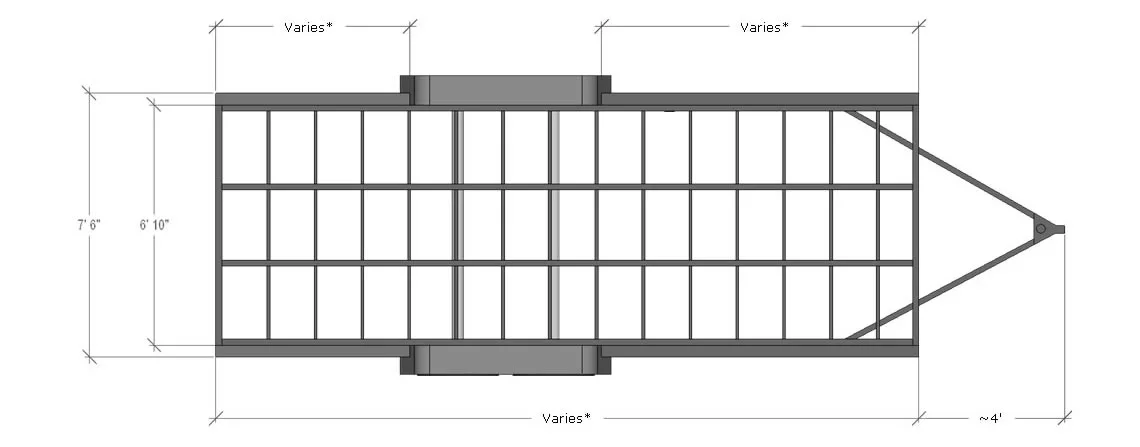
Common Measurements
Below are some common measurements of our standard trailer without any customizations. However, we frequently extend the width of our trailers to meet the design requirements of the house that is to be built on it. Each of the tiny house plans that we sell list the optimal trailer width for that specific house. We’ll talk more about deciding on the appropriate trailer width later on.
What to Consider When Choosing a Tiny House Trailer
Now that you have the basic parts of a trailer under your belt, let’s discuss all the different considerations you’ll need to make when deciding on a trailer.
Tiny House Trailer Type
Tiny house trailers come in several types depending on your needs and the design of your house. The most common types are bumper-pull, gooseneck, and deckover.
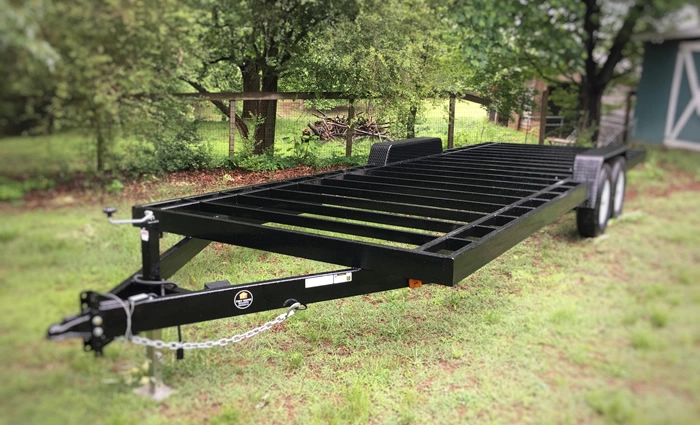
Bumper-pull Trailers
Bumper-pull is the most common type of trailer used for tiny houses. They provide a relatively flat surface that isn’t too high off the ground. Learn more about bumper-pull tiny house trailers.
Gooseneck Trailers
Gooseneck trailers have gained in popularity over the last few years for their added build space and easier mobility. But they have a unique look that sometimes makes them look more like RVs. Learn more about gooseneck tiny house trailers.
Deckover Trailers
Deckover trailers have a deck that is above the height of the fenders so that you have a flat surface to build on. But that comes at the cost of added height which reduces the room you have to build and adds a step or two to enter your home. Learn more about deckover tiny house trailers.
Trailer Build Style
There are many trailer styles available, but only some of those trailer styles are suitable for a tiny house.
Equipment Trailer Style
Equipment trailers are designed to move vehicles and heavy equipment. Like all trailers, they are built with a specific purpose in mind, and trailer manufacturers add features to them to facilitate accomplishing that purpose. The problem is, some of those features may make it more difficult to build a tiny house on. For instance, a dovetail is a great trailer feature if you plan to transport a vehicle, but will make building a house much more difficult, as well as make the house considerably less attractive.
Tiny Home Builders tiny house trailers are specifically built to build a house on. Every design decision has been made with that goal in mind. Since tiny house trailers don’t cost any more than a standard equipment trailer, there is no compelling reason to build your house on an equipment style trailer.
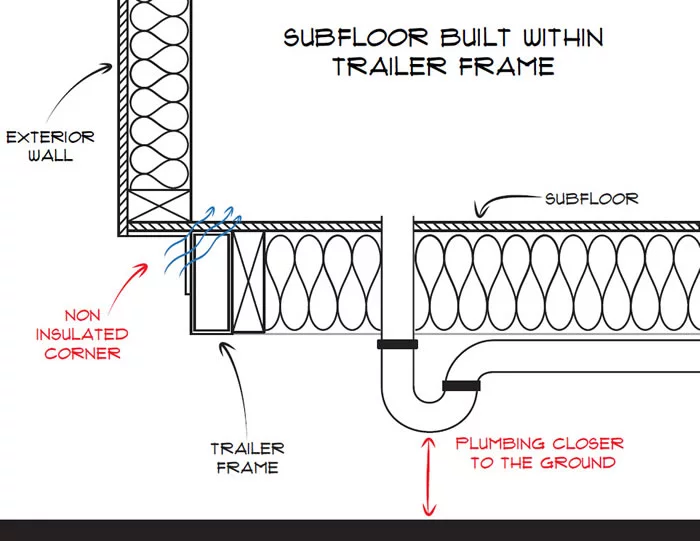
Tiny House ‘Build On Top’ and ‘Build Within’ Styles
When it comes to tiny house trailers specifically, there are two predominant trailer styles available; ‘build on top’, and ‘build within’. The first is our default style that involves building a subfloor on top of the trailer, and then constructing the house on top of that subfloor. The second style has the trailer act as the subfloor with the sheathing installed directly onto it. While we can build either trailer style, for several reasons we prefer and build our houses on the first (much like the RV industry).

Tiny House Trailer Build-On-Top Style
Tiny House Trailer Build-Within Style
The advantage of the second style is that it provides 3-1/2 inches of additional interior height because there is no subfloor. While that is a desirable benefit, it comes at a cost. Below are the advantages of building a subfloor on top of your trailer.
Consistent thermal envelope
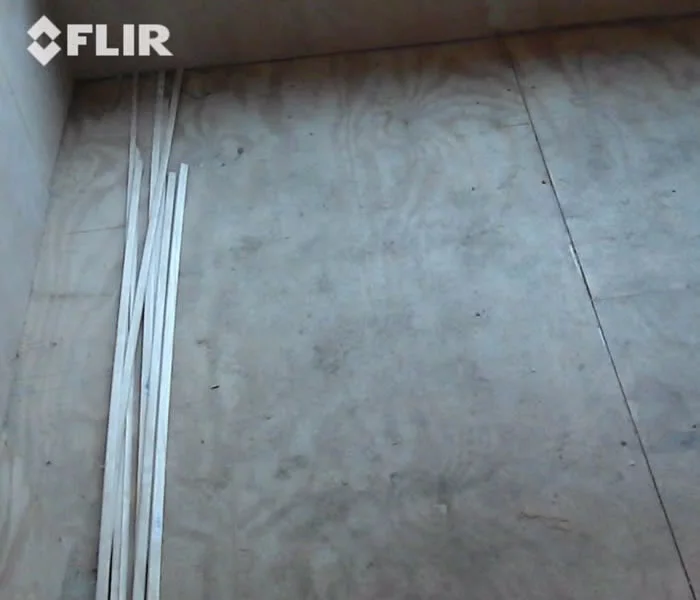
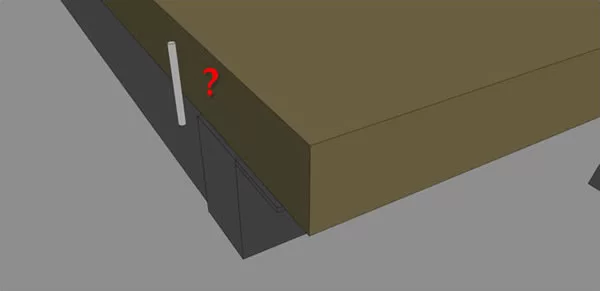
By having the insulated subfloor built on top of the trailer you can maintain a consistent thermal envelope. When the subfloor is within the trailer, it is not possible to fully insulate all corners of the thermal envelope (see diagram below). Since steel and wood are terrible insulators, there is no thermal break to stop outside temperatures from entering your home. The steel acts as a thermal bridge to bring the outside temperature inside (see thermal images below). This can lead to condensation which can potentially cause mold and mildew under your flooring.
Build-Within Style Metal Cross Members Act as a Thermal Bridge

Build-Within Style Metal Cross Members Act as a Thermal Bridge
Wider house
With the subfloor built on top of the trailer, you can build wider than the trailer by cantilevering the house over the sides if you choose to do so. When the subfloor is constructed within the trailer, your house width is fixed to the size of your trailer which may be significantly smaller.
Room for Plumbing
By constructing the subfloor on top of the trailer, there is plenty of room for the drain lines that need to extend through the subfloor. Some of those drain lines (e.g. shower) will need to have a trap installed (see diagram below) and all the drain lines need to run “downhill” to properly drain. Plumbing takes up space. If your subfloor is built within the trailer, this can result in very little ground clearance between the road and the relatively delicate plumbing.

Cross-Section View of House with Build-On-Top Style
Cross-Section View of House with Build-Within Style
Trailer Length
When deciding on the length of your trailer, there are two things you should consider. First, what is the minimum size house that you would be comfortable and happy in, and second, how often do you plan to move your house?
In most places, if you wish to travel without obtaining a permit, your vehicle can be no larger than 8.5 feet wide and 13.5 feet tall. Since your tiny house design will likely be sized to (or close to) those limits, changing the length becomes the only way to change the square footage (i.e. you can’t add a second floor). So you will need to pick a tiny house design, and thus a length, that suits your needs.
While you may be inclined to just pick the largest size to get the most square footage, you will also need to consider mobility. As your trailer size increases, so too does the challenge of moving it. A larger trailer takes a larger tow vehicle and is generally more difficult to maneuver. How often you plan to move your house and where you plan to park it may affect the size that’s right for you.
Our most popular trailer sizes are the 20 and 24 foot models. They provide a good mix of size and ease of mobility.
The sizes list are the deck lengths and do not include the length of the tongue (approximately 4 additional feet). Custom lengths, between 10 feet and 32 feet are also available.
Trailer Width
A trailer has a couple of different widths, specifically the distance between the outside edges of the fenders and the width of the trailer deck. When we discuss trailer width, we are referring to the deck width. That’s what most people are generally more interested in since that is the surface in which the house will be built on.
On a normal equipment trailer, the deck width is 82 inches wide. On our trailers, we extend this an additional 4 inches on each side for a total width of 90 inches. We do this using a piece of angled steel that provides both support and a great place to attach your home to your trailer. But just because it’s 90 inches, or 7 feet 6 inches, doesn’t mean that that is the widest your house can be built. Many of our house designs have a base that is 7 feet 10 inches wide, such that it cantilevers, or hangs over, the sides of the trailer by 2 inches on either side. Incidentally, on our designs after we add our overhangs (or eaves) and additional siding materials the houses end up being 8 feet 6 inches wide, which is the maximum width allowed in most states. If your house design calls for a wider width at the base, for instance a house with a shed style roof, or you don’t want your house to cantilever the sides we can extend the width to any size up to 8 feet 6 inches. Just add a note with your desired width on the form below.
Please note that while we can build a trailer's deck to be 8’6” (or 102”), we rarely recommend this. Even if your house doesn’t have any overhangs (or eaves), by the time you add the siding, you will likely have exceeded the 8’6” limit. Usually the widest deck width we build is 8'4" if the builder does not intend to obtain permits to move the house.

Standard Width
Extended Width
Trailer Axles
Each trailer's default axle size (axles capacity, rim and tire size, etc.) is based on our experience of building tiny homes, and what they typically weigh. But occasionally someone needs something unique. Either they expect their home to weight more than a standard tiny house or are looking for a lower trailer deck to give them more room for their home.
Drop Axles
Drop axles are special axles that allow the deck (or top surface) of a trailer to be between 3 to 4 inches lower. This can be especially useful for tiny houses since there is a cap on the total height of your house, usually 13.5 feet. Thus, the only way to gain additional interior height is the lower the deck. That doesn’t mean that drop axles are required though. When we build our houses we don’t normally use drop axles, and we still have a comfortable amount of height both above and below our lofts. On the downside, drop axles reduce the ground clearance of your trailer. This is less of a concern for shorter trailers but can become more of an issue on longer trailers. Finally, because of the way drop axles work, they take up a little more room between the wheels and so there is a little less space between the fenders.
Upgraded Axles
When it comes to axle capacity, all of our trailers include axles that are rated to exceed the anticipated weight of your house. For our 20 foot and shorter trailers, we use two 5200 lbs. axles which gives the trailer a capacity of about 10,000 lbs. (GVWR). For our larger trailers we use either 2 or 3 7000 lbs. axles for a total weight capacity of between 14,000 and 21,000 lbs. It’s unlikely that you would need to upgrade the capacity of your axles unless you plan to build a house that you expect to be much heavier than a typical house of its size. An example of this would be if you were building a house that was to be used as a food truck.
Other Trailer Customizations
Beyond just the type and length of the trailer, you can customize quite a bit to fit your exact needs. Not sure what those are, give us a call or send us your house plans and we can help you figure it out. While most of the trailer we build are our standard design, below are a few of the most popular items people like to change.
Stabilizing Jacks
We are occasionally asked why our trailers don’t come with jacks pre-installed. The reason is that unlike an RV, tiny houses aren’t typically moved very often, and hand jacks are a temporary solution. If you have ever camped in a RV, you know that stabilizing jacks just aren’t that effective. And while someone staying in an RV for a weekend may be willing to forgo a little more work for the convenience of a less effective jack, a homeowner is unlikely to make that same trade off. Our recommendation is to use 6-ton jack stands if the ground under your house is solid, or in areas that experience higher wind where the house won’t be moved, having helical piers installed.
With that said, if you do plan to move your house more often, we do offer a jack option that we have found to be considerably better than scissor jacks. Contact us for additional information.
Welded Bolts
While having bolts welded to the trailer to attach your subfloor may seem like a good idea, they can be difficult to work with. First, if the bolts are welded to the sides of the trailer, you’ll need to make sure that you have a joist in that exact location to attach to it. This can require you to add an extra joist or change your plans to fit your trailer. Bolts welded to the back or front of the trailer are even worse. In these locations the subfloor doesn’t typically hang over the edge, so you would have to cantilever the subfloor over the back edge just to accommodate that bolt.
Bolt Not Centered Makes it Difficult to Use Properly
It can also be challenging to work with a fixed bolt, since you will need to pre-drill the wood before putting it in place. This can be hard to line up correctly and you will need to do so before you attach the board to anything else, otherwise you will be moving your entire subfloor just to make these holes. While it can be worked around, when building a house, we would prefer not to have the extra hassle.
On our trailers we prefer to drill through the steel flange along the sides of the trailer, after the subfloor has been constructed. This allows you to put the bolts wherever your joist ends up, which is why we don’t pre-drill the flange either. While it may seem intimidating to drill holes through the metal flange, all you need is a standard drill and a good drill bit. Other manufacturers talk about plasma cutters and special drills to scare you into thinking that you can’t do it, but you’re about to build a house, what’s a few more holes to drill? For information on attaching your house to our trailers including a video illustrating how easy it is to drill through the metal on the trailer, check out our help topic on attaching a tiny house to a trailer.
Underside Flashing (belly pan)
While sealed underside flashing is great for protecting the underside or your house from road debris and rodents, it also has the downside of trapping any water that does find its way into your subfloor. Normally flashing is used to keep water out of an area, for instance we use flexible flashing around our windows. However, since water can often find ways into areas it’s not supposed to be in, you never want to install flashing in such a way that the water can’t escape. For instance, in our window example, flexible flashing is not installed along the bottom edge of the window so that any water that does inadvertently end up behind it has an unobstructed path to leave. If the flashing is welded to the bottom of the trailer, it can trap water which may have several negative effects such as mold and rust.
Trailer Underside Flashing Holding Water
So if we don’t recommend a welded underbelly, what is the alternative? Again we borrow a page from the RV industry and use Coroplast which is a corrugated plastic, like what is used for some realtor and yard sale signs. This is screwed onto the bottom after the plumbing and insulation is installed.